
Thursday, August 30, 2012
ViewFlipper with Animation
ViewFlipper is a simple ViewAnimator that will animate between two or more views that have been added to it. Only one child is shown at a time. If requested, can automatically flip between each child at a regular interval.


Using a Slide Transition with the Android ViewFlipper
Github Repo
If your app only has one View, your app is probably pretty boring. However, if you’re building an interesting app you’ll probably have to switch between multiple Views, maybe go back and forth and have some nice animations. You could write your animations and manually do the transitioning yourself but once you get more than 2 or so Views that’s gonna get tough to keep up with (and messy!). Fortunately the ViewFlipper solves this problem quite nicely.
Step 1.
Let’s start all the way at the beginning, File -> New Android Project. Feel free to use your own Application and Package Names but make sure you tell it to create a MainActivity. This will be the Activity that controls the transition between Views.
If your app only has one View, your app is probably pretty boring. However, if you’re building an interesting app you’ll probably have to switch between multiple Views, maybe go back and forth and have some nice animations. You could write your animations and manually do the transitioning yourself but once you get more than 2 or so Views that’s gonna get tough to keep up with (and messy!). Fortunately the ViewFlipper solves this problem quite nicely.
Step 1.
Let’s start all the way at the beginning, File -> New Android Project. Feel free to use your own Application and Package Names but make sure you tell it to create a MainActivity. This will be the Activity that controls the transition between Views.
Monday, August 13, 2012
Use AppLaud to Create a Web App Project, Run it on a Device or Simulator
*Primer tutorial for MDS AppLaud 1.2 Eclipse Plugin for PhoneGap for Android
This tutorial uses the basic PhoneGap demo. See all 5 demo apps included with AppLaud.
Prerequisites
The first Two-Minute Tutorial (TMT0) presents in detail the steps to create a new project, understand project and file contents, enable and review JSLint settings, and run the app on a device or simulator. Users who have already run a PhoneGap app from Eclipse may prefer to skip to TMT1. The MDS AppLaud Plugin includes 5 demo projects ready to run out-of-box.
This tutorial uses the basic PhoneGap demo. See all 5 demo apps included with AppLaud.
Prerequisites
- Installation of the latest MDS AppLaud plugin fromhttp://www.mobiledevelopersolutions.com/
- If you have not successfully installed Eclipse and the plugin (Eclipse Helios, ADT, etc) see instructions here:http://www.mobiledevelopersolutions.com/home/start
- If you encountered problems during installation or have questions, please join the google group and post any questions or comments: http://groups.google.com/group/eclipse-plugin-for-phonegap
Part 1 Use Project Creation Wizard to create new Web App Project
[Android PhoneGap] Getting Started with AppLaud - The Detailed Version
Complete installation steps
1&2. If you don't yet have the Android ADT set up click here.
3. Install MDS AppLaud 1.2 Phonegap for Android plug-in
3. Install MDS AppLaud 1.2 Phonegap for Android plug-in
- From Eclipse ADT, Select Help -> Install New Software
- Click Add to enter a new Repository site
- The Name field is optional, "MDS AppLaud 1.2" suggested
- In Location, enter the download site: http://svn.codespot.com/a/eclipselabs.org/mobile-web-development-with-phonegap/tags/r1.2/download
- Select OK
- Select the New Site and Check the box to the left of PhoneGap for Android
- Click Finish and Follow the prompts
Friday, August 10, 2012
PHP User online tutorial
This tutorial show you php script that count how many users are active on your site.
Overview
In this tutorial, create 1 PHP file for testing this code.
1. user_online.php
Steps
1. Create table "user_online" in mysql in database "test".
2. Create file user_online.php.
1. user_online.php
Steps
1. Create table "user_online" in mysql in database "test".
2. Create file user_online.php.
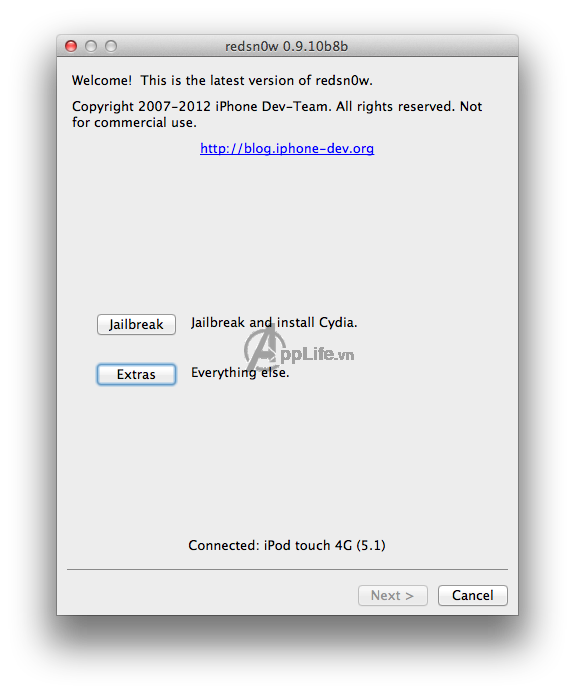
[ TUTORIAL ] jailbreak with Redsn0w iOS5.1.1
Trước khi thực hiện, bạn cần sao lưu thiết bị qua iTunes (gắn thiết bị vào máy, bật iTunes, click phải chuột vào tên thiết bị trong iTunes và chọn Backup).
- Download Redsn0w 0.9.10b8b (lựa chọn phiên bản cho: Mac OS X hoặc Windows)
- Nâng cấp lên iOS 5.1.1 (hoặc tải trực tiếp iOS 5.1.1 và sử dụng iTunes để nâng cấp)
- Tải iOS 5.1xuống máy (chọn phiên bản phù hợp với thiết bị đang sử dụng) và đặt ở Desktop hoặc chỗ nào để bạn có thể dễ dàng tìm thấy, chúng ta cần phiên bản iOS 5.1 để có thể jailbreak iOS 5.1.1
- Click chạy “Redsn0w” và nhấn chọn “Extras”
Friday, August 3, 2012
Apache Tomcat Eclipse Integration
Apache Tomcat makes hosting your applications easy. The Eclipse IDE makes development easy. It's simple math. If you haven't integrated Tomcat into your Eclipse environment, you're losing out on some great enhancements to your development process.
Imagine being able to write a new servlet, deploy it to a Tomcat server, test it, make changes, redeploy, and restart Tomcat - all within Eclipse, all without editing a single XML file by hand. Time-saver? Sanity-preserver? All of the above? You bet. Here's an easy guide to getting Tomcat and Eclipse working together, from installing the Tomcat plug-in, to configuring your first server.
In the interest of simplicity, this tutorial assumes that you've already installed:
- a JDK of version 1.4.2 or higher
- the Tomcat version of your choice (version 5.5.x or higher is recommended)
- Eclipse 3.1 or higher, along with the EMF (Eclipse Modeling Framework), GEF (Graphical Editing Framework), and JEM (Java EMF Model) components
If you need more information on installing these items, visit the Eclipse and Apache Tomcatdocumentation pages. And to make your Apache Tomcat environment enterprise ready, learn more about Tcat, the leading enterprise Apache Tomcat application server.
Installing Tomcat 7.0.x on OS X
Tomcat 7 is the first Apache Tomcat release to support the Servlet 3.0, JSP 2.2, and EL 2.2 specifications. Please note that Tomcat 7 requires Java 1.6 or better, but that shouldn’t be a problem, if you are running OS X 10.5 or 10.6.
 On OS X 10.7 (Lion) however, Java is initially not installed anymore. You can find the installer on Apple’s support sidehere or follow this installation guide, provided by Adobe. Whatever you do, when opening Terminal and running java -version, you should see something like this.
java version "1.6.0_31"
Java(TM) SE Runtime Environment (build 1.6.0_31-b04-415-11M3646)
Java HotSpot(TM) 64-Bit Server VM (build 20.6-b01-415, mixed mode)Here are the easy to follow steps to get it up and running on your Mac
Thursday, August 2, 2012
How To Use UIScrollView to Scroll and Zoom Content
This is a blog post by iOS Tutorial Team member Matt Galloway, founder of SwipeStack, a mobile development team based in London, UK.
UIScrollViews are one of the most useful controls in iOS. They are a great way to present content larger than a single screen, and there’s a lot of tips and tricks about using them you should know!
In this tutorial you’ll learn all about UIScrollViews, from beginning to advanced. You’ll learn:
- How to use a scroll view to view a very large image.
- How to keep the scroll view’s content centered while zooming.
- How to embed a complex view hierarchy inside a UIScrollView.
- How to use UIScrollView’s paging feature in conjunction with the UIPageControl, to allow scrolling through multiple pages of content.
- How to make a “peeking” scroll view that gives a glimpse of the previous/next page as well as the current page.
- And much more!
This tutorial assumes some familiarity with Objective-C and iOS programming. If you are a complete beginner, you may wish to check out some of the other tutorials on this site first.
This tutorial also assumes that you know how to use Interface Builder to add new objects to a view and connect outlets, so make sure that you do. Further, this tutorial uses a storyboard. You’ll want to get familiar with them if you aren’t already, perhaps by reading the Storyboards tutorial on this site.
Lastly, I’ll be using Xcode 4 in this tutorial, so make sure you’re fully updated to the latest version available through the Mac App Store.
Getting Started
Fire up Xcode and create a new project with the iOS\Application\Single View Application template. EnterScrollViews for the product name, enter the company identifier you used when creating your App ID, leave the class prefix blank, set device family to iPhone, and make sure that Use Storyboards and Use Automatic Reference Counting are checked (but leave the other checkboxes unchecked):

Click Next and choose a location to save your project.
Wednesday, August 1, 2012
Change Mac OS X 10.7 Lion Login Screen With Loginox
We have covered a handful of tools to tweak with Mac OS X 10.7 Lion native utilities and UI elements; some worth noting tweaking applications are, Deeper 1.4 (tweaks with Mac Lion native utilities), Docker (customizes system dock), Lauchpad-control (hides Launchpad applications), Reverse Scroller (customizes Mac Lion default scrolling behavior), and Lion Tweaks (toggles Mac Lions exclusive features On/Off). Today we discovered Loginox, which lets you tweak with Mac OS X Lion login screen. Since Mac OS X Lion login screen is a complete rewrite of Mac Snow Leopard login screen, many tweaks contrived for previous versions of Mac doesn’t work on Mac OS X Lion. Loginox not only replaces the default background of Mac OS X Lion login screen with specified background image but allows you to change the Apple logo as well.
Changing Mac OS X Lion login screen with Loginox is easy. Launch the application and drag the image, which you want to use as login screen, over New Login image section. Now click Set new Login image and enter administrator password to change the default login screen.

Changing Mac OS X Lion login screen with Loginox is easy. Launch the application and drag the image, which you want to use as login screen, over New Login image section. Now click Set new Login image and enter administrator password to change the default login screen.
Subscribe to:
Posts (Atom)
Popular Posts
-
I spent a long time to config them. so tired, but now it run very good. It's work. Step 1: Download Source PhoneGap at PhoneGap.com...
-
Để chuyển 1 file .app sang .ipa đầu tiên các bận cần có là 1 file .app, trong hướng dẫn mình sử dụng file Tuvi.app 1. Mở xcode len 2. Men...
-
Trong bài này mình sẽ giới thiệu với các bạn về lập trình Socket(bài này mình chỉ nói đến lập trình Socket cho TCP/IP) trong Android. Lập ...
-
Xử lý ngày tháng trong PHP Trừ ngày $date = "2009-03-02"; $new_date = strtotime ( '-2 day' , strtotime ( $date ) ) ; ...


